
We recently published a post recommending 4 integration tools that make it easy for small & mid-sized businesses to innovate office productivity, and this series will help you apply those tools to your own workplace. In this post, we’re looking at how you can use Google Forms to collect more meaningful feedback from your team, and integrate it into your workflow.
I’m going to use the example of a helpdesk ticket submission form, but you can apply this to any process or app using Zapier.
Creating Valuable Helpdesk Tickets with Google Forms
One key to getting more meaningful feedback from your users is by asking the right questions in an intuitive way. Google Forms is a great platform for fine-tuning your feedback process and presenting your questions cleanly and effectively.
The helpdesk is a great place to apply Google Forms because many helpdesk platforms offer overly generic and simple ticket forms. So how do you implement Google Forms without abandoning your helpdesk platform? Use Zapier to link the two!.
Step 1: Form Setup
Google Forms makes it extremely easy to get started with a custom form, and it has many options and features for you to fine tune things like:
- Choose color themes and backgrounds
- Name your Form
- Set the destination of your responses
For this guide, the most important thing is to choose “Create New Spreadsheet” as your response destination. This ensures that every time the Form is filled out, the responses will appear in their own Google Sheet (along with a timestamp), which will be the file that gets integrated with Zapier for the tickets to roll in smoothly.
Step 2: Ask valuable questions
Creating the best Form is up to you, but remember that your objective is to make it easy for the user to give you the most valuable information possible. Google Forms offers a bevy of features to help you do things like:
- Set validation for responses
- Use valuable question types
- Create an intuitive “path” for the user
Required Questions
Required Questions have an obvious benefit: you can’t submit the Form if you skip any! This ensures that the ticket must contain the correct pertinent information before it gets sent off to your helpdesk, meaning you won’t lose any time clarifying missing details.
In case you set any required multiple choice questions, be sure to set an “Other” option, for users who have trouble identifying the best response for their issue.

Multiple choice questions
Multiple choice questions save your users the trouble of typing out common problems or details. In turn, it’s up to you to phrase these questions and choices in a lexicon that your team will easily understand. As mentioned above, you can also set an “Other” choice, as an option for users who can’t find the best choice among the ones you’ve presented to them.
Multiple choice is great for Yes/No questions as well. By adding questions that can only be answered with an absolute “Yes” or “No”, you can quickly confirm details that are essential to how you handle their issue, such as whether or not a request has been approved by a supervisor.
Checkboxes
Similar to multiple choice questions, checkboxes are a quick way for users to identify the problems they’re troubleshooting—though multiple choice may be more valuable, because an “either/or” option ensures that the user will self-identify the best choice before moving on to the next question.
Paragraph Fields
The entire purpose of Google Forms is to ask pointed questions to your users, but by leaving a paragraph field at the end of the Form (called something like “Other details?”), you can leave room for the user to add details that didn’t fit elsewhere on your form.
“Go to Section” responses
To streamline the Form for your users, you can separate your Form into multiple pages or “Sections”, and allow users to skip over sections which aren’t pertinent to their issue.
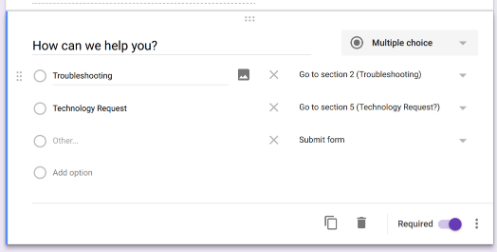
In the above example, you can ask if the user needs troubleshooting, or a more specific request for a tool. Depending on how they answer, it will send them to a different page of the Form so they can give you the details necessary for their issue.

Step 3: Integrating your Form with your ticket platform
Our integration tool of choice is Zapier, but you can reference this post to find a tool that works with your helpdesk management platform. In Zapier, the next steps are easy:
Select a Trigger
- Choose “Make a Zap”.
- When asked to choose a trigger app, select Google Sheets.
- When asked to select a trigger, select “New Spreadsheet Row”.
- When asked to select a Google Sheets Account, select the account which owns your Google Form Responses Sheet (and authorize Zapier to connect that account, if necessary).
- When asked to Set Up Google Sheets Spreadsheet Row, you’ll be asked to select the Sheet you’re connecting (your Form Responses Sheet), and the Worksheet (which should be “Form Responses 1, if you haven’t modified anything).
- Once Zapier automatically tests your trigger, it will prompt you to connect your “Action App”—in other words, your helpdesk platform.
- Once you’ve selected yours, you’ll be asked to choose your action. The phrasing may vary between different platforms supported by Zapier, but you want to choose the one closest to “Create Ticket”.
- When asked to select a helpdesk account, select the account associated with the helpdesk platform you’re setting up to receive tickets (and authorize Zapier to connect that account, if necessary).
- Once you’ve confirmed your helpdesk platform, you’ll be asked how you’d like to populate tickets using the Google Form responses. This will vary slightly depending on the heldpesk platform you’re working with, but will consist of things like:
- Which queue will receive the tickets from your Form
- The title of your ticket
- Priority level
- Displayed user email
- Due date
- Schedule date
- The description (the main body) of the ticket being submitted
The most important step here is to set the description to be populated using the “Content” option. By choosing content, you’re telling Zapier to take you all of the specific Form responses from that ticket, and paste them in as text in the body of the ticket.

The rest of this step leaves creativity up to you—you can choose to have all tickets be named after the user submitting them, you can choose that all tickets come in at “normal” urgency instead of high priority, and so on.
- When you’re happy with how the ticket is set up, you can click “Continue”, and Zapier will show a preview of how a ticket will appear when it hits your helpdesk platform, and then ask if you’d like to send a test ticket to the platform immediately, to see how it works.
- Zapier will then ask you if you’d like to add another step to your zap (you can chain multiple actions together to create complex workflows, but that’s better saved for another post). Once you’re done fine tuning, you can click “Finish” and the Zap will be active and functioning!
Select an Action
Populate the Ticket
See how Newmind Group does it
We use Google Forms as custom tickets with our clients. When they need to request a new user account, they’re given a link to this form which asks for the exact details we need to fulfill that request.
![]()
As soon as the user clicks “Submit”, Zapier grabs the responses and uses them to populate a ticket in Zendesk, our helpdesk management platform of choice. Our team receives the details in our helpdesk queue, where it appears as a normal ticket, with all the details we need to get a new account open quickly.
So what’s the final result?
A happy user who gets their help faster, without needing to reconnect with the helpdesk to clear up specifics.
Zapier is compatible with dozens of other apps you can link with Google Forms, too—Trello, Hubspot, Base CRM, Slack, Gmail, and hundreds more.
As you use integration tools to get your tedious tasks to run in the background, the value you can bring to work will skyrocket. We’d love to take a look at your team’s day-to-day and help you find ways streamline the little things. Give us a call.